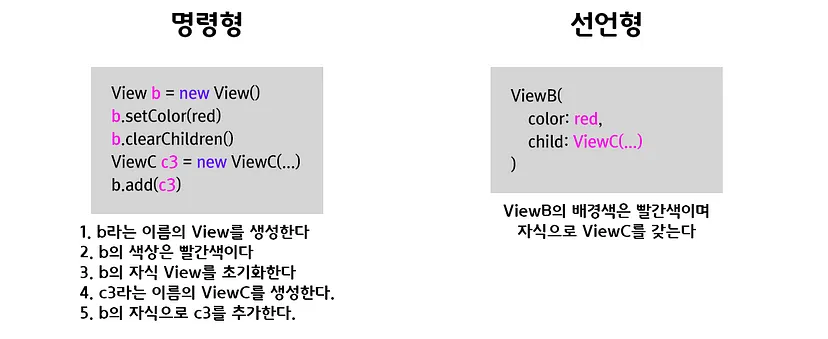
명령형 프로그래밍과 선언형 프로그래밍
두 프로그래밍 방법은 뭐가 다를까! 2023-06-15
명령형 프로그래밍과 선언형 프로그래밍
먼저 아래의 코드는 배열을 인자로 받아서 요소들을 2씩 곱해서 반환하는 것이다.
이 코드를 선언형 프로그래밍에 가깝게 만들어보자.
배열에 있는 값을 어떻게 처리 할 것인가?에서 벗어나서, map이라고 정의된 규칙에 의해, 어떠한 과정을 거쳐서 만들거냐, 무엇을 원하느냐가 더 중요해 진다.
만약 앞서 배열을 받아서, 배열의 요소를 2배씩 늘려서 반환하는 선언형 프로그래밍코드에
배열이 아닌 문자열이 들어간다면 어떻게 처리해야 할까?
위의 경우 추가적으로 코드를 변경할 수 밖에 없다.
그럼 위 요구사항을 선연형 프로그래밍 방식으로 적용해보자.
또 다른 예시를 살펴보자. 요구사항은 털 색이 까만색이 포함되어 있으면서 귀가 접히지 않은 고양이들을 뽑는 것이다. 먼저 명령형 프로그래밍 방식으로 이를 구현하면 다음과 같다.
이제 이 코드를 선언형 프로그래밍 방법으로 바꿔보자.
UI를 만드는데 선연형 프로그래밍이 더 효과적인 이유
선언형 UI는 상태와 같이 무엇을 랜더링할지 정의해주는 것을 의미한다.
명령형과 비교해 더 작은 코드로 직관적인 UI를 만들 수 있다.
먼저 주어진 요구사항은 화면에 버튼을 3개 넣고, 버튼을 클릭하면 삭선이 그어지도록
만드는 것이다.
버튼을 3개 만든다.
만든 버튼을 화면에 그린다.
버튼을 클릭하면 삭선이 그려진다.
이런 방식에서 버튼이 굉장히 많이 추가되었을떄, 유연하게 대응하기 힘들어진다. 코
드의 양도 늘어나고, 한눈에 알아보기도 쉽지 않다.
이제 toggleButton이라는 버튼으로 추상화를 해보자. 독립적으로 돌아가도록 만들어보
자.
토글 버튼 하나를 만드는데 핗요한 코드가 모두 ToggleButton 함수 안에 위치한다. 이
벤트를 등록하는 것까지 ToggleButton 안에 있어서, ToggleButton은 결국 target만 잘
받는다면, 잘 동작한다.
이렇게 토글버튼에 필요한 것들을 응집력있게 모아둠으로써, 기능이 추가되었을 때 유
연하게 대응할 수 있다.
예를들어
3번 클릭할 때마다 alert경고창을 띄우는 요구사항이 새로 생성되었다고 가정해보자
.
처음 작성한 코드에서는, 버튼 3개별로, 따로 버튼 별로 Count를 둬야한다. 이 경우버
튼이 늘어났을 떄, 각 버튼 별로 Count가 너무 많아져 읽기도 구분하기도 힘들고, 읽
기도 어려워진다.
그럼 선언적으로 바꿔서 기능을 추가해보자
먼저 - 3번 클릭할떄마다 alert경고창을 띄워보자!
위의 코드는 버튼 마다 Count를 두지 않아도되서, 더 간단하고 ToggleButton안에
count변수를 두었다. 만약, 주어진 3번클릭할떄마다 경고창을 띄운다라는 요구사항을
특정 버튼에만 쓰려면 어떻게 할까?
이 경우
다만 위의 코드도 문제가 있다. 버튼의 상태가 textDecoration이 있냐 없냐에 따라 결
정되는데, UI의 상태를 추상화하고 , 해당 상태에 따라 랜더 함수를 통해, 상태의 변
화를 따라가는 방식이 더 좋고, 현명하다!
UI가 상태를 기반으로 랜더링 되게 만든다!
먼저 ToggleButton 컴포넌트에서 상태를 나타내보자.
이런식으로 count상태, 토글되었는지 나타내는 상태를 만들고, 상태를 바꾸는
setState를 만든다. 그 후 render함수는 상태에 따라 다른 UI를 반환하고, 클릭했을떄
상태를 setState로 갱신한다.
그럼 새로운 요구사항이 들어왔다면 어떻게 할까?
5초 뒤에 토글되야(삭선이 있다면 없게, 없다면 있게!) 한다
마지막 요구사항으로 ButtonGroup을 만들어보자. 버튼을 그룹지어서 한번에 만드는 것
이다.
컴포넌트 방식으로 생각하기
사실 이렇게 선언형으로 무엇을 하고자 하는지 생각해서 컴포넌트를 짜 본적이 없는것
같다. 항상 컴포넌트를 짤 떄, 선언형으로 무엇을 하고자 하는지 생각해야겠다.!.
function double ( arr ) {
//배열을 받아서 요소들을 2씩 곱해서 반환
let results = [ ] ;
for ( let i = 0 ; i < arr . length ; i ++ ) {
results . push ( arr [ i ] * 2 ) ;
}
return results ;
}
// double([1,2,3,4]) => [2,4,6,8]
console . log ( double ( [ 1 , 2 , 3 , 4 , 5 ] ) ) ;
//[2,4,6,8,10]
function double ( arr ) {
return arr . map ( ( number ) => number * 2 ) ;
}
function double ( arr ) {
let results = [ ] ;
//숫자인 경우를 판별하기 위해 typeof연산자를 추가로 사용
for ( let i = 0 ; i < arr . length ; i ++ ) {
if ( typeof arr [ i ] === 'number' ) {
results . push ( arr [ i ] * 2 ) ;
}
}
return results ;
}
function double ( arr ) {
//숫자만 뽑고 숫자만 2씩 곱한다.
return arr
. filter ( ( params ) => typeof params === 'number' )
. map ( ( number ) => number * 2 ) ;
}
const data = [
{
name : '동글' ,
colors : [ 'yellow' , 'white' ] ,
age : 7 ,
ear : 'folded' ,
} ,
{
name : '초코' ,
colors : [ 'brown' ] ,
age : 3 ,
ear : 'unfolded' ,
} ,
{
name : '마루' ,
colors : [ 'black' , 'brown' ] ,
age : 5 ,
ear : 'unfolded' ,
} ,
{
name : '뽀삐' ,
colors : [ 'orange' , 'white' ] ,
age : 2 ,
ear : 'folded' ,
} ,
{
name : '루시' ,
colors : [ 'gray' , 'white' ] ,
age : 4 ,
ear : 'folded' ,
} ,
null ,
] ;
function filterCats ( cats ) {
let results = [ ] ;
for ( let i = 0 ; i < cats . length ; i ++ ) {
const cat = cats [ i ] ;
if ( cat && cat . colors . includes ( 'black' ) && cat . ear === 'unfolded' ) {
results . push ( cat . name ) ;
}
}
return results ;
}
const filterdCats = filterCats ( data ) ;
const data = [
{
name : '동글' ,
colors : [ 'yellow' , 'white' ] ,
age : 7 ,
ear : 'folded' ,
} ,
{
name : '초코' ,
colors : [ 'brown' ] ,
age : 3 ,
ear : 'unfolded' ,
} ,
{
name : '마루' ,
colors : [ 'black' , 'brown' ] ,
age : 5 ,
ear : 'unfolded' ,
} ,
{
name : '뽀삐' ,
colors : [ 'orange' , 'white' ] ,
age : 2 ,
ear : 'folded' ,
} ,
{
name : '루시' ,
colors : [ 'gray' , 'white' ] ,
age : 4 ,
ear : 'folded' ,
} ,
null ,
] ;
function filterCats ( cats ) {
return cats
. filter (
( cat ) => cat && cat . colors . includes ( 'black' ) && cat . ear === 'unfolded'
)
. map ( ( cat ) => cat . name ) ;
}
const $button1 = document . createElement ( 'button' ) ;
$button1 . textContent = 'Button1' ;
const $button2 = document . createElement ( 'button' ) ;
$button2 . textContent = 'Button2' ;
const $button3 = document . createElement ( 'button' ) ;
$button3 . textContent = 'Button3' ;
//방법 1
document . querySelectorAll ( 'button' ) . forEach ( ( $button ) => {
$button . addEventListener ( 'click' , ( e ) => {
const { target } = e ;
if ( target . style . textDecoration === 'line-through' ) {
target . style . textDecoration = 'none' ;
} else {
target . style . textDecoration = 'line-through' ;
}
} ) ;
} ) ;
//방법 2
const $main = document . querySelector ( '#app' ) ;
$main . appendChild ( $button1 ) ;
$main . appendChild ( $button2 ) ;
$main . appendChild ( $button3 ) ;
$button1 . addEventListener ( 'click' , ( ) => {
if ( $button1 . style . textDecoration === 'line-through' ) {
$button1 . style . textDecoration = 'none' ;
} else {
$button1 . style . textDecoration = 'line-through' ;
}
} ) ;
$button2 . addEventListener ( 'click' , ( ) => {
if ( $button2 . style . textDecoration === 'line-through' ) {
$button2 . style . textDecoration = 'none' ;
} else {
$button2 . style . textDecoration = 'line-through' ;
}
} ) ;
$button3 . addEventListener ( 'click' , ( ) => {
if ( $button3 . style . textDecoration === 'line-through' ) {
$button3 . style . textDecoration = 'none' ;
} else {
$button3 . style . textDecoration = 'line-through' ;
}
} ) ;
function ToggleButton ( { $target , text } ) {
const $button = document . createElement ( 'button' ) ;
let isInit = false ;
this . render = ( ) => {
$button . textContent = text ;
if ( ! isInit ) {
$target . appendChild ( $button ) ;
$button . addEventListener ( 'click' , ( ) => {
if ( $button . style . textDecoration === 'line-through' ) {
$button . style . textDecoration = 'none' ;
} else {
$button . style . textDecoration = 'line-through' ;
}
} ) ;
isInit = true ;
}
} ;
this . render ( ) ;
}
const $app = document . querySelector ( '#app' ) ;
new ToggleButton ( {
$target : $app ,
text : 'Button1' ,
} ) ;
new ToggleButton ( {
$target : $app ,
text : 'Button2' ,
} ) ;
new ToggleButton ( {
$target : $app ,
text : 'Button3' ,
} ) ;
function ToggleButton ( { $target , text } ) {
const $button = document . createElement ( 'button' ) ;
let clickCount = 0 ;
this . render = ( ) => {
$button . textContent = text ;
$target . appendChild ( $button ) ;
} ;
$button . addEventListener ( 'click' , ( ) => {
clickCount ++ ;
if ( $button . style . textDecoration === 'line-through' ) {
$button . style . textDecoration = 'none' ;
} else {
$button . style . textDecoration = 'line-through' ;
}
if ( clickCount % 3 === 0 ) {
alert ( '3번 클릭!' ) ;
}
} ) ;
this . render ( ) ;
}
const $app = document . querySelector ( '#app' ) ;
new ToggleButton ( {
$target : $app ,
text : 'Button1' ,
} ) ;
new ToggleButton ( {
$target : $app ,
text : 'Button2' ,
} ) ;
new ToggleButton ( {
$target : $app ,
text : 'Button3' ,
} ) ;
new ToggleButton ( {
$target : $app ,
text : 'Button4' ,
} ) ;
특정한 일이나 행위를 ToggleButton 밖에서 정의하고, 이를 ToggleButton으로 주입하면 어떨까? function ToggleButton ( {
$target ,
text ,
//이 부분을 밖에서 주입받는다
onClick ,
} ) {
const $button = document . createElement ( 'button' ) ;
let clickCount = 0 ;
this . render = ( ) => {
$button . textContent = text ;
} ;
$button . addEventListener ( 'click' , ( ) => {
if ( $button . style . textDecoration === 'line-through' ) {
$button . style . textDecoration = 'none' ;
} else {
$button . style . textDecoration = 'line-through' ;
}
if ( onClick ) {
onClick ( clickCount ) ;
}
} ) ;
this . render ( ) ;
}
const $app = document . querySelector ( '#app' ) ;
new ToggleButton ( {
$target : $app ,
text : 'Button1' ,
//클릭했을 떄 특정 행위를 주입한다.
//3번클릭할때 경고창을 밖에서 주입함
onClick : ( clickCount ) => {
if ( clickCount % 3 === 0 ) {
alert ( '3번째 클릭' ) ;
}
} ,
} ) ;
new ToggleButton ( {
$target : $app ,
text : 'Button2' ,
} ) ;
new ToggleButton ( {
$target : $app ,
text : 'Button3' ,
} ) ;
new ToggleButton ( {
$target : $app ,
text : 'Button4' ,
} ) ;
this . state = {
clickCount : 0 ,
toggled : false ,
} ;
//이전상태를 새 상태로 갈아끼운다
this . setState = ( nextState ) => {
this . state = nextState ;
this . render ( ) ;
} ;
this . render = ( ) => {
$button . textContent = text ;
$button . style . textDecoration = this . state . toggled ? 'none' : 'line-through' ;
} ;
$button . addEventListener ( 'click' , ( ) => {
this . setState ( {
clickCount : this . state . clickCount + 1 ,
toggled : ! this . state . toggled ,
} ) ;
} ) ;
function ToggleButton ( { $target , text , onClick } ) {
const $button = document . createElement ( 'button' ) ;
$target . appendChild ( $button ) ;
this . state = {
clickCount : 0 ,
toggled : false
}
this . setState = ( nextState ) => {
this . state = nextState ;
this . render ( ) ;
}
this . render = ( ) => {
$button . style . textDecoration = {
this . state . toggled ? 'line-through' : 'none'
}
}
$button . addEventListener ( 'click' , ( ) => {
this . setState ( {
clickCount : this . state . clickCount + 1 ,
toggled : ! this . state . toggled
} )
} )
if ( onClick ) {
onClick ( this . state . clickCount ) ;
}
this . render ( ) ;
}
function TimerButton ( { $target , text , timer = 3000 } ) {
const button = new ToggleButton ( { $target , text , onClick : ( ) => {
setTimeout ( ( ) => {
button . setState ( {
... button . state ,
toggled : ! button . state . toggled
} )
} , timer ) ;
} } ) ;
}
new TimerButton ( {
$target : $app ,
text : '3초 뒤에 자동!'
} )
new TimerButton ( {
$target : $app ,
text : '10초 뒤에 자동' ,
timer : 1000 * 10
} )
function ButtonGroup ( {
$app ,
//버튼들의 파라미터들
buttons
} ) {
let isInit = false ;
const $group = document . createElement ( 'div' ) ;
this . render = ( ) => {
if ( ! isInit ) {
buttons . forEach ( { type , ... props } ) => {
if ( type === 'toggle' ) {
new ToggleButton ( {
$target : $group ,
, ... props
} ) ;
}
else if ( type === 'timer' ) {
new TimerButton ( {
$target : $group ,
... props
} ) ;
}
}
$target . appendChild ( $group ) ;
isInit = true ;
}
}
this . render ( ) ;
}
new ButtonGroup ( {
$target : $app ,
buttons : [
{
type : 'toggle' ,
text : '토글 버튼' ,
} ,
{
type : 'timer' ,
text : '타이머 버튼' ,
timer : 1000
}
]
} )